Create Selection profiles
The following training tutorials guides you how to define selection profiles in SAP step by step. In our previous SAP training tutorials we have learnt how to define code masking and status profile in SAP.
You can access selection profiles screen by using one of the following navigation method in SAP.
- SAP IMG path: – SPRO -> IMG ->Project system -> Structure -> Operative structure -> Milestones -> Define selection profiles.
- Transaction code: – BS42
Step 1: – Enter transaction code “BS42” in the SAP command field and enter.

Step 2: – On the status selection overview screen, click on “new entries” to maintain the selection profiles as per project requirements.
![STATUS SELECTION NEW ENTRIES] STATUS SELECTION NEW ENTRIES]](http://www.sapnoob.com/wp-content/uploads/2019/03/STATUS-SELECTION-NEW-ENTRIES.png)
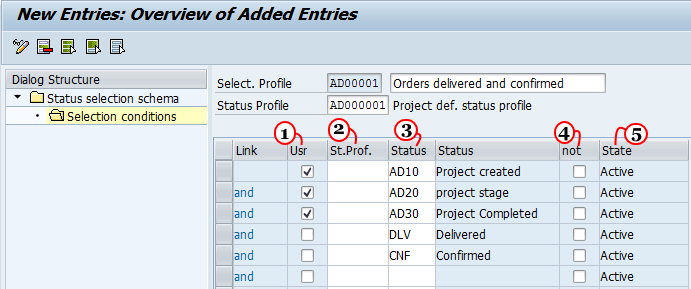
Step 3: – On new entries overview screen, update the following fields.
- Select. Profile: – Update the seven digits alphanumerical ID that identifies the selection profile and update the descriptive text of the selection profile
- Status profile: – Update the status profile id that you have created earlier.

Step 4: – Click on “selection conditions” and on next screen click on new entries button.

Step 5: – On new entries screen, update the following selection condition details.
- Usr (User): – Select the user option if status is for user status.
- Stats.prof: – This is optional field, update the user status profile.
- Status: – Update the status from the drop down list, if status is a user status then select “X” with status profile from drop down list.
- Not: – Select this field if you want exclude the selected conditions in report.
- State: – State indicates the selection profile is active.

After maintaining all the details, click on save button to save the configured selection profile data.

Leave A Comment?
You must be logged in to post a comment.