When we want to use a new material in SAP, we have to define it’s characteristics, in order to control it’s behaviour in all of the transactions. Every material is created in the either of these two ways:
- By calling transaction MM01 (mostly used in a productive environment)
- Mass creation (mainly used only once on transition of materials from the previous system into SAP ERP)
We will focus now on transaction MM01, and leave the mass creation for later since it is an advanced tool. We will discuss it after you have enough knowledge about material master views and organizational levels.
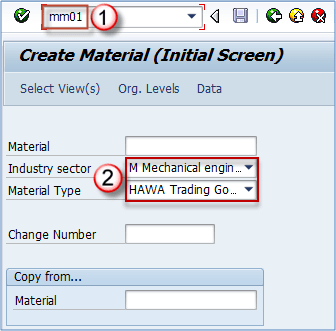
Step 1) Transaction that is used for the creation of material master record, as stated above is MM01. The execution of the transaction brings us to the initial screen, which consists of few fields that contain the basic information on our material.
- Enter Industry sector (mostly used: M-Mechanical engineering)
- Enter Material type, (it can be FERT, ROH, HALB, HAWA – the appropriate material type for current material)

Note: Material number (alphanumerical key uniquly identifying material in SAP system) can be generated automatically or assigned manually – it depends on material type. For material type HAWA for example, you can have manual number assignment, while for FERT you can have automatic number assignment. These settings are supposed to be done by MM consultant in customizing during the implementation.
Step 2) We can choose which master data to create.
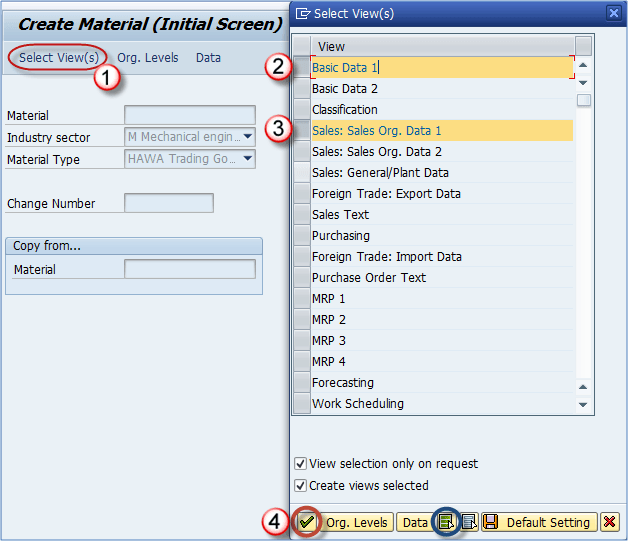
- We can click on Select View(s) to choose which views we need to create for the material.
- Select Basic Data 1
- Select Sales Org Data 1. You can always extend the material master data later if you forgot to choose all needed views.
- Select the Check Mark. You can see an option button marked in blue on the screen below for selecting all views (rarely used in a productive environment).

Note: Selection of views that can be maintained for material depends on material type. In most of the systems some views are disabled for certain material types ( for example MRP views might be disabled for trading goods).
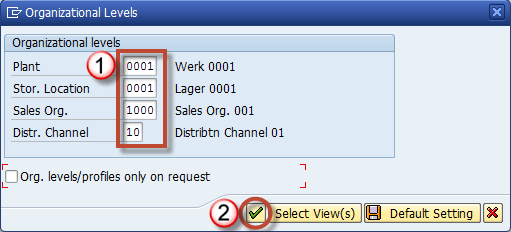
Step 3) In the next screen
- Enter Organizational levels for the views we selected in the previous step.For example, those could be Plant, Storage Location, Sales Organization and Distribution Channel etc.
- Click the Check Button

Below you can find a complete reference of organizational levels needed for creating material master views.
| Material Master View | Organizational Levels |
|---|---|
| Basic data (1 & 2) | None |
| Classification | None |
| Sales organization data (1 & 2) | Plant, Sales Organization, Distribution Channel |
| Sales General | Plant |
| Foreign Trade – Export data | Plant |
| Purchasing | Plant |
| MRP Views | Plant, Storage Location, MRP Profile |
| Forecasting | Plant, Forecasting Profile |
| Work Scheduling | Plant |
| General Plant Data (Storage 1 & 2) | Plant, Storage Location |
| Warehouse Management 1 | Plant, Warehouse Number |
| Warehouse Management 2 | Plant, Warehouse Number, Storage Type |
| Quality Management | Plant |
| Accounting (1 & 2) | Plant |
| Costing (1 & 2) | Plant |
Table of material master views connection to organizational levels
IMPORTANT: You need to maintain materials in all of your organizational levels in which they are going to be used. If you have more than one plant than you have to repeat MM01 transaction in order to extend your materials for both plants. If you have more than one combination of Sales organization/Distribution channel you also have to repeat the process in MM01 for all of the combinations.


Leave A Comment?
You must be logged in to post a comment.