Welcome to How to Create Tables in SAP tutorial. This tutorial is part of our free SAP ABAP training and you will learn how to create tables in SAP. We will start with transparent tables, explain important details of their creation and then show how to convert them to pool or cluster tables.
In our last tutorial, we reviewed what types of tables exist in SAP ECC environment and how they are categorized. We also touched table creation technique. Now, let us get a good grasp of how to create tables in SAP.
All database tables in SAP ECC are created in ABAP Data Dictionary (transaction SE11) in a similar way. However, different table types have their peculiarities one should be aware of. In the first part of the tutorial, we will consider the general procedure of creation which applies presumably to transparent tables, whilst pool and cluster particularities would be given in the end.
How to Create SAP Transparent Table
Firstly, one should specify the name of the table in the corresponding field.
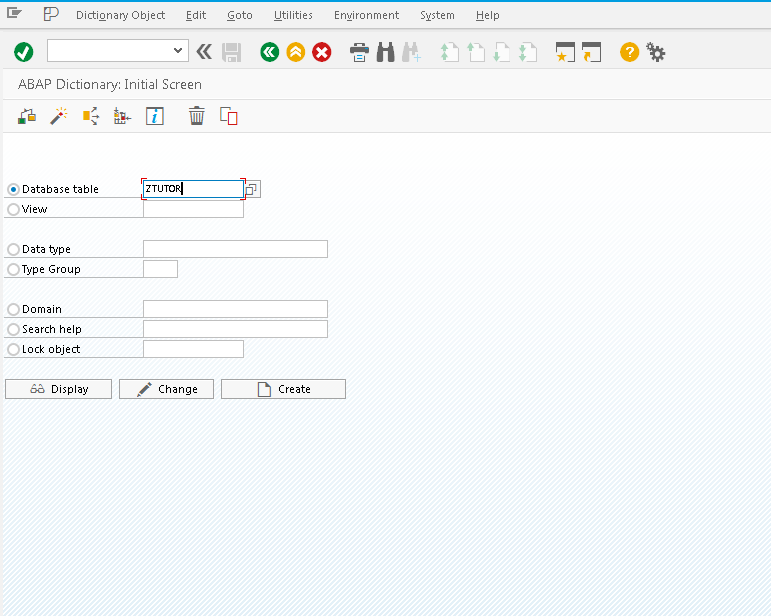
As one can see from the picture, the user is provided with controls to display the necessary table before creation, to change the existing table, and to create it from scratch. We will stick to the latter in our example.
Basic Table Parameters
Here we have the following initial screen which allows to specify basic table parameters.
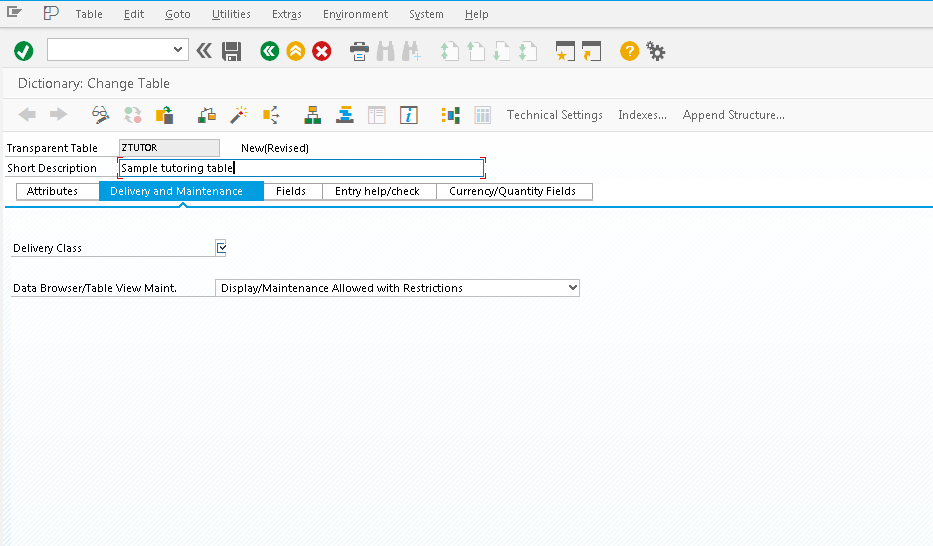
Short description is a supplementary attribute on the first sight, however without specification of the description you won’t be allowed to save and activate the table. Also, adding a meaningful description will help further maintainers of your table to get an idea of what data is stored there.
Delivery class attribute is a very important attribute one should always consider during creation of the table. It is significant because all SAP objects are created for later delivery to a different client in SAP installation. How tables are transported and with which parameters is determined by the delivery class.
SAP table can be assigned the following delivery classes:
- Delivery class A
- Delivery class C
- Delivery class L
- Delivery class G
- Delivery class E
- Delivery class S
- Delivery class W
Besides its importance, delivery class is a bit out of the scope of this tutorial and requires extensive knowledge of SAP TMS (Transport Management System) that will be covered in one of the next tutorials. The only thing you should know is that delivery class defines which data is transported during client copies, system upgrades, and transporting tables between customer systems. The classes you will use most often are A and C.
Data Browser/Table View Maintenance is a so-called maintenance flag, which define whether the table can be displayed and edited in certain transactions, or edited at all. It should be properly considered and planned during projecting the table, because its changing post-factum isn’t always possible and brings some complications. This flag has three main positions:
- Display/maintenance not allowed: This option means that a table cannot be neither displayed nor edited in any transaction. Use this option only for system tables that should not be accessible by users.
- Display/maintenance allowed to limited extent: With this option, a table becomes accessible for display in SE16 transaction but editing there is prohibited. Editing is possible only via standard maintenance SE54 transaction.
- Display/maintenance allowed: This option fully allows display and editing in any way, both in SE16 and SE54 transactions.
Table Fields Specification
After specification of necessary parameters, we go ahead to table structure specification which resides on the third tab, called Fields. Here one should enter all the fields and their type specifications required for storing table data.
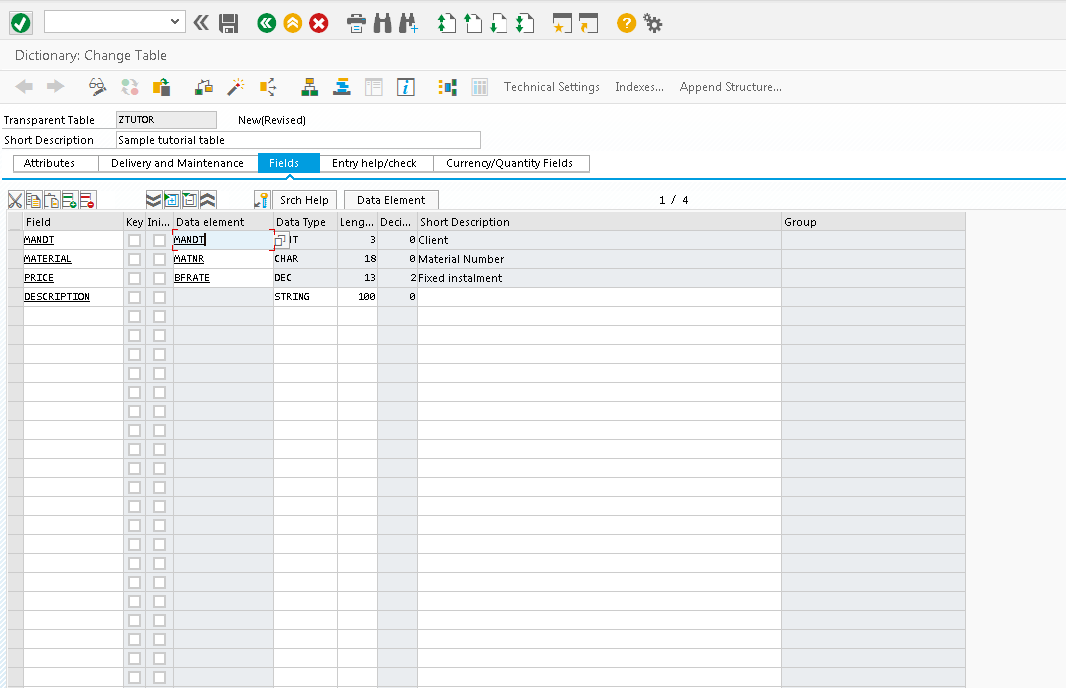
Here field names and field types are entered, together with the descriptions. What things one should pay attention to?
First of all, it’s client-dependence. As one might know, all SAP systems are divided into logical units, called clients, which helps to make developments transportation more safe and robust. Therefore, any table in SAP can be client-dependent or not, i.e. differs from different client or persist the same data across all clients. Why does it matter? It defines how your data is exposed. If you going to store some transactional or temporary data relevant only to the same client, you should make you table client-dependent, otherwise, if you plan to store settings relevant for multiple clients, you should choose client-independent (cross-client) table.
The field MANDT serves this exact purpose in the table. If we specify this field as the table primary key, then SAP knows that this table is client-dependent and treats it accordingly. On the other hand, if SAP doesn’t find it within primary key, it treats the table as cross-client.
Secondly, it is data specification point. Field type in ABAP table can be defined in two ways: using data elements and using simple ABAP data types. What is the difference here?
Data elements are predefined objects which denote full type metadata: technical type, length, labels, etc. Where this can be useful? It is used in case you have complex type in many places and want to reuse the same data element, i.e. you don’t need to recreate it multiple times. On the other hand, if your table is one-time task, you simply might not want to persist this metadata settings for reuse. It is all up to a developer. On the above picture, all fields have data element specification, whilst the last one, DESCRIPTION, is specified by ABAP Dictionary primitive type.
As one can notice, all fields in the table have two checkboxes called Primary key and Initial values. What are they for? The Primary key field is quite self-explanatory, all fields with this checkbox make the table’s primary key. As every ABAP Dictionary table must have a primary key, so at least one field in a table always have this checkbox ticked.
Initial values checkbox is a more interesting phenomenon. It is similar to NULL and NON-NULL concept in relational databases but somewhat unique. When this checkbox is enabled newly inserted DB records will contain initial value, i.e. value which is predefined by ABAP for any field which value is not explicitly assigned. Similar concept applies also to pure ABAP types in runtime. If this checkbox is not enabled, all new rows will have NULLs in the fields with unticked Initial values checkboxes.
SAP Table Technical Settings
The next step of table creation is setting up technical settings of a table. This is an obligatory step, which will be proposed to you by the system, unless you do this explicitly via Goto -> Technical Settings menu or Ctrl-Shift-F9 key combination.
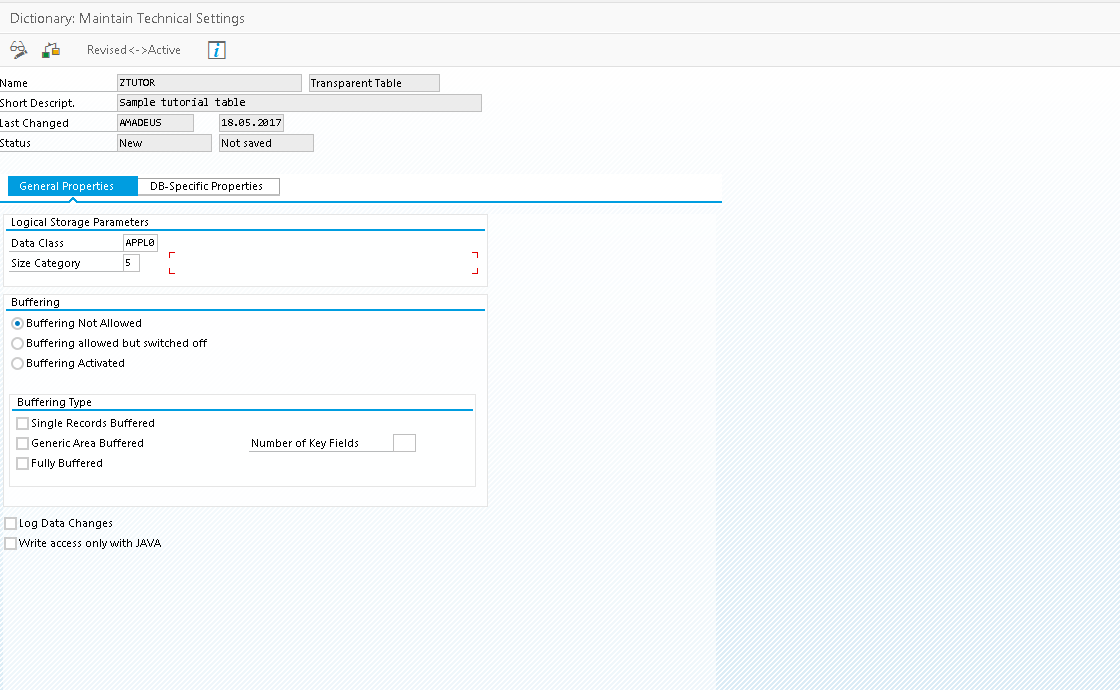
Data Class and Size Category were thoroughly reviewed in the previous tutorial, so we will not focus on them.
What should one consider while choosing between Buffering types? First of all, frequency of data updating. If data is changed frequently, then buffers are not appreciated because obsolete data might be read from the buffer, while actual data has already been changed. Secondly, it is table size. For a small table, full buffering is acceptable. However, for big tables, such as MARA, single records buffering is more preferable choice.
Pool and Cluster Tables Specifics
In the previous tutorial, we have touched the prerequisites of pool and cluster table creation, and here we will review the full procedure.
As we know, the important prerequisite of creation of pool or cluster table is to have an already created table pool or table cluster. Which tool should one use for the creation of pools and clusters? Nothing new here, just good old SE11 transaction. To create pool or cluster, just go to Utilities menu from the initial SE11 screen and select Other Dictionary Objects. Then, you will see a simple window where a name of pool/cluster should be entered.
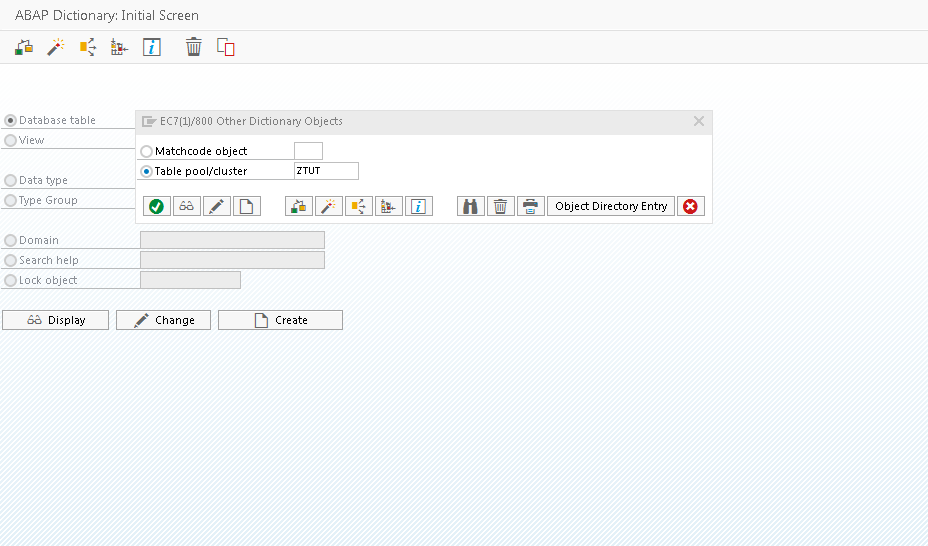
On the next screen, object type should be specified as shown on the screenshot below.
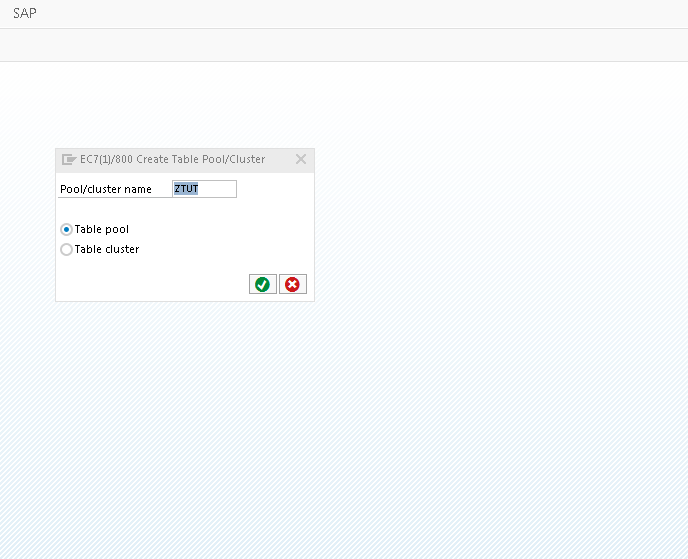
On the next screen, pool attributes are specified. We will not focus on them, as they were described in our previous tutorial. The only thing that should be noted is that you should not change default values here, unless you have a clear understanding what to change and why do you need it. Wrong values can result in a significant performance decrease of the table. Short description is an obligatory parameter here.
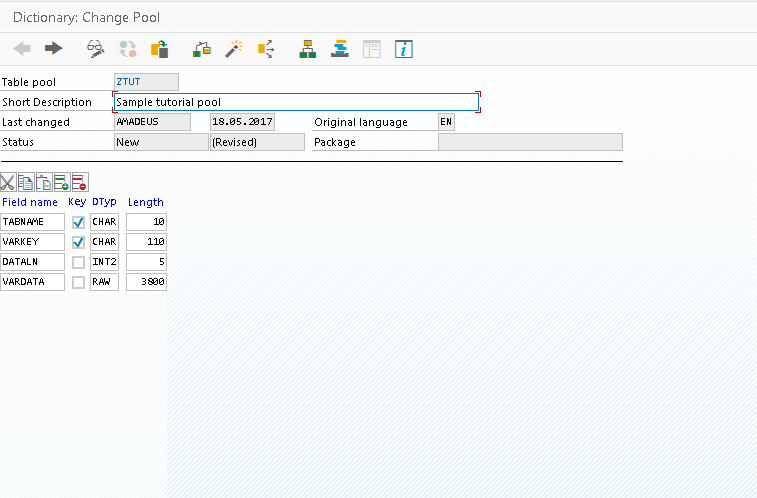
The last step is saving and activating the pool. Now, we have a brand-new pool. What should we do then? Of course, create the pooled table.
There is no special procedure for creating a pooled table in ABAP Dictionary, so creation of a pooled table involves two-steps process:
- Creating a transparent table as usual, which is considered in the first part of tutorial.
- Changing its type to pooled or clustered.
The second step is done the following way:
- Firstly, target table is opened in edit mode.
- Then, via Extras -> Change/Display Table Type menu its type is changed to the desired one.
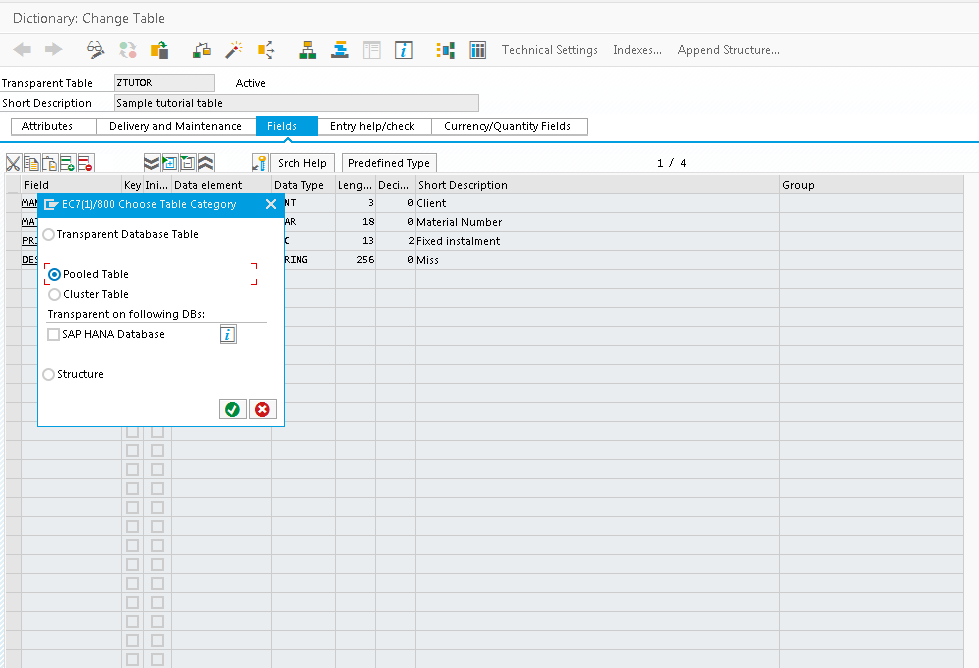
Now, you know how to create tables in SAP.

Leave A Comment?
You must be logged in to post a comment.