Create project profile
The following SAP tutorials guides you how to maintain project profile in SAP step by step. In our previous SAP training tutorials we have discussed about how to define coding mask, create status profile and define selection profile.
You create project profile by using one of the following SAP navigation method.
- SAP IMG Path: – SPRO -> IMG (F5) -> Project system -> Structures -> Operative structures -> Work breakdown structure -> Create project profile.
- Transaction code: – OPSA.
Step 1: – Enter transaction code “OPSA” in the SAP command field and press enter to continue.
Step 2: – On project profile overview screen, click on new entries to maintain new project profile as per organizations project requirements.

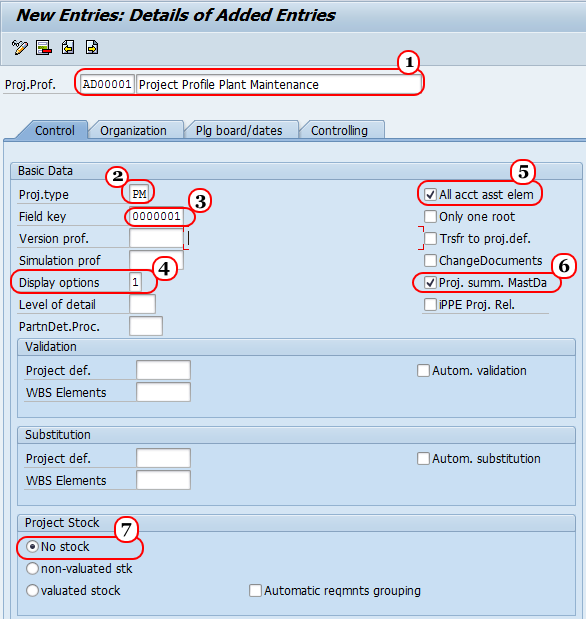
Step 3: – On the New entries screen, update the following fields.
Control
- Proj.prof. (Project profile) : – Enter the unique ID that identifies the project profile in SAP and update the descriptive text of the project profile.
- Project type: – It determines in which category project belongs.
- Field key: – Update the field key from the drop down list, different project profiles can have different field keys.
- Display options: – It determines how the project will be identified in project builder. Possible entries are (1- Identification using project number, 2- Identification using short description and 3- Identification using text).
- All account assessment element: – Select this field if all the WBS to be created through this profile.
- Project summarize master data : – Select this field to summarize the project master data through characteristics, if you have not selected this field you are not able to perform any reports.
- Project stock: – Project stock is default with no stock option.

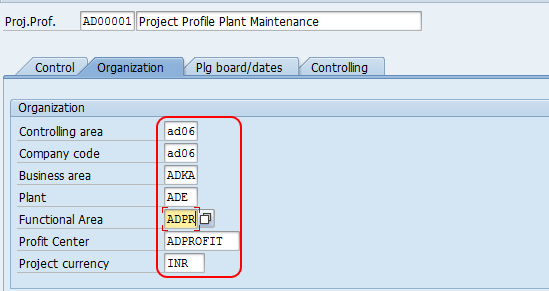
Step 4: – Click on organization tab and update the following fields.
- Controlling area: – Update the controlling area that the project profit profile belongs.
- Company code: – Update the company code that control area belongs to
- Business area: – Update the business area that belongs to company code and controlling area
- Plant: – Update the plant code that belongs to company code
- Functional area: – Enter the functional area key.
- Profit center: – Update the profit center that belongs to controlling area.
- Project currency: – Update the currency of the project.

Click on save button and save the configured data.

Leave A Comment?
You must be logged in to post a comment.