Split Valuation in SAP configuration steps
Tutorial guides you how to configure split valuation in SAP MM step by step with screen shots.
Step 1 :- Define Global Valuation Types
IMG Menu Path :- SPRO > SAP Reference IMG > Material Management > Valuation and Account Assignment > SplitValuation > Configure split valuation
T Code :- OMWC
Enter Transaction code OMWC in the SAP command field and press enter.
Select cancel
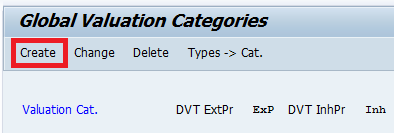
In next screen select “Global Types”
Select “Create” and update the mandatory fields
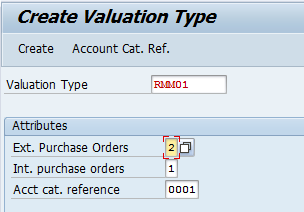
Create valuation type screen : – update the following fields
Valuation type:- Give the key to identifying the valuation type.
Attributes:-
Ext.purchase orders:- select external PO allowed or not. Where the possible entries are
0- No external purchase orders allowed,
1- External purchase orders allowed, but warning issue allowed,
2- External purchase orders allowed.
Int. purchase orders:- Select internal PO allowed or not, possible entries are
0- No Internal purchase orders allowed,
1- Internal purchase orders allowed, but warning issue allowed,
2- Internal purchase orders allowed.
Acct cat. reference:– Account reference is a mandatory field. Select drop-down button and select appropriate key
Select Create icon and you get a message as “Valuation Type RMM01 was/were created. Save icon to save the configured data.
Successfully configured the split valuations.
Step 2 :- Define “Global Valuation Categories”
Select back button two times and select global categories
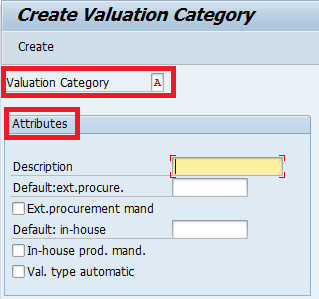
Maintain the field entries as described below
Valuation Category:- Enter the valuation category key
Attributes
Description:– Update the description of valuation category key.
Default:ext.procure. :– Default external procurement
Ext.procurement mand :– If this check box is selected, the valuation type can not be changed at PO level.
Val. type automatic :- This check box is used for split valuation and batch management
Select Create icon and you get a message as “Valtn category A was/were created. Select save icon to save the configured data.
Step 3 :- Assign Valuation type to valuation categories
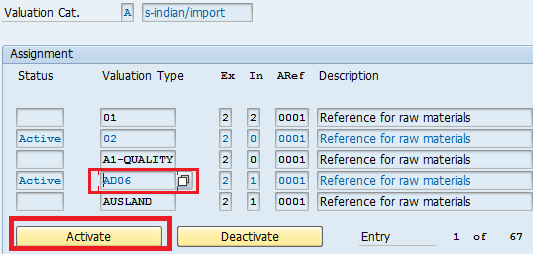
Go to Global valuation category and select types category
Select required valuations type and click on Activate button
Message will be displayed as “Valuation type AD06 activated”


Leave A Comment?
You must be logged in to post a comment.