Introduction
In this blog post I have shared my experience about how to perform the SuccessFactors SSO configuration by integrating SAP Cloud Platform Identity Authentication (IAS), SAP Cloud Platform Identity Provisioning Service (IPS) and Azure AD account.
This upgrade will disable Partial SSO and your PWD users will need to login through a different URL and an IAS feature is needed to be enabled.
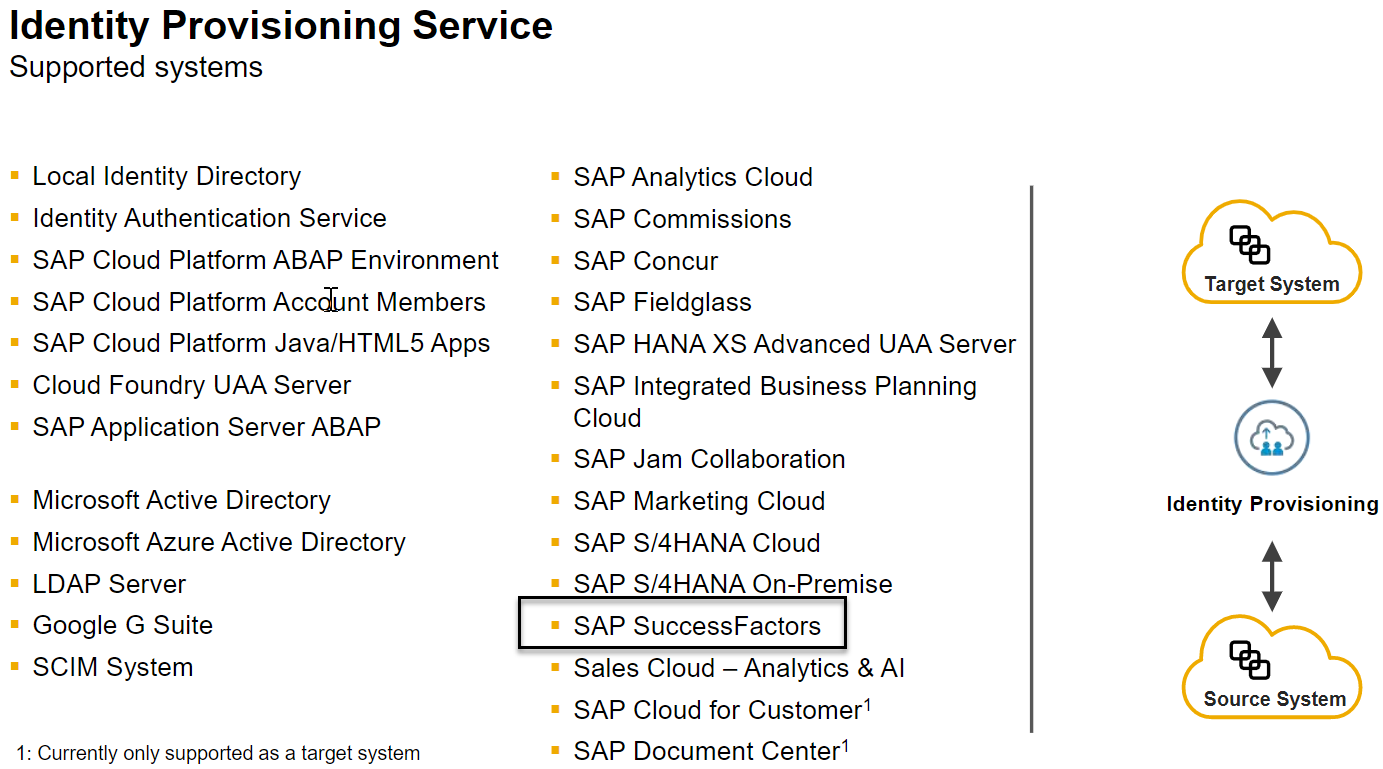
Identity Provisioning Service Supported systems
Prerequisites
- Have the SAP SuccessFactors administrator user access to the Upgrade Centre.
- We should have the valid customer S-User.
- Make sure you have the admin user in SF Admin and S-User.
- You need to have Admin access to both your SAP Cloud Platform Identity Authentication (IAS) & SAP Cloud Platform Identity Provisioning Service (IPS) tenants .(If you do not have the details regarding IAS & IPS URL please create an incident to BC-IAM-IDS for IAS or BC-IAS-IDS)
Step by Step Procedure:
Step 1: Initiate SAP SuccessFactors solutions with SAP Cloud Platform Identity Authentication through the Upgrade Centre.
1.1 Login into SAP SuccessFactors instance with admin user.
1.2 Go to Home -> Admin Center
1.3 Click on Upgrade Center

1.4 Search in optional upgrades “Initiate SuccessFactors SAP Cloud Platform Identity Authentication Service Integration” and click Learn More & Upgrade Now.

Note: If you don’t find in optional upgrades then check in “View Recently Completed Upgrades” or if you have triggered the system refresh (Example: System1->System2) please perform the changes as per note 2954491 – IAS Integration Upgrade post refreshes issue.

1.5 Click on Upgrade Now

1.6 Enter your S-User & Password and click on Validate button

1.7 Maintain SAP Cloud Platform Identity Authentication(IAS) tenant URL and click on the Submit button

1.8 Click on ‘Yes’ to start the upgrade
Note: We will not be able to undo this feature once it is upgraded.

1.9 The upgrade process can take over 2 hours to be completed.

1.10 We can check the upgrade status in Admin Center -> Upgrade Center -> Completed Upgrades


Note: You will receive an email with your IPS information once the upgrade completed or if you already have an IPS, you can check on the setup on Source for when it creates a new Source and Target for your SF and IAS tenants it will be completed.
Step 2: Azure Active Directory integration with SAP Cloud Platform Identity Authentication
2.1 There is a detailed step-by-step tutorial from Microsoft regarding how to create Azure AD
2.2 Save your settings and download the Federated metadata XML file. Example: TEST.XML
2.3 Login to IAS Administration console. In the “Corporate Identity Providers” menu, create a new entry. I have given it the name “TEST”.

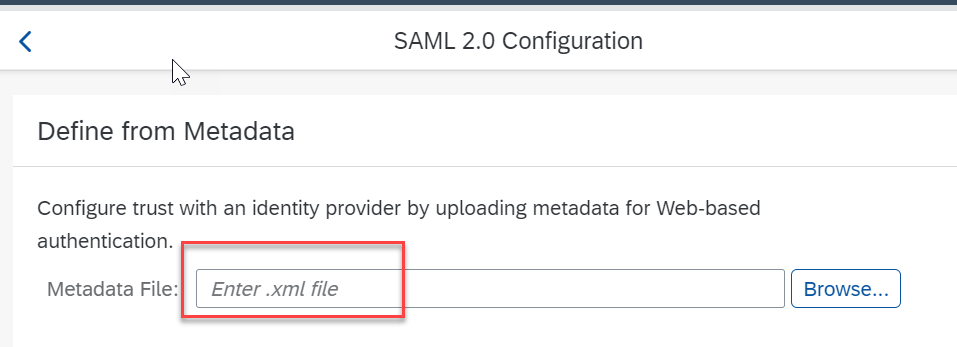
2.4 SAML 2.0 configuration – Upload the metadata XML file

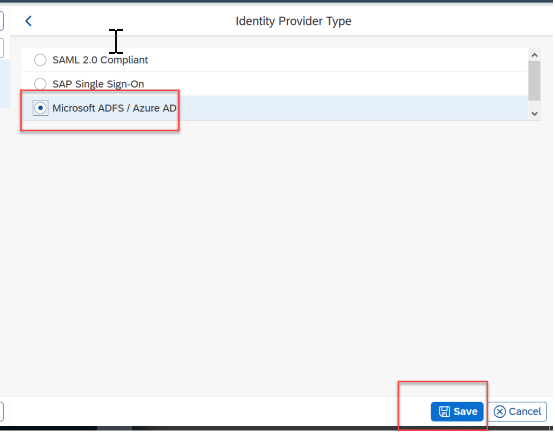
2.5 Identity Provider Type – Set it to “Microsoft ADFS/Azure AD”

Note: If you want to add additional accounts you can follow the Steps 2 again. Example: TEST@com and TEST.in
Step 3: Conditional Authentication Configuration
Tenant administrator can control the access to an application by defining different rules for the authenticating identity provider. Based on these rules users are authenticated either via a corporate identity provider or via SAP Cloud Platform Identity Authentication.
When you upgrade to Identity Authentication, the flag for partial SSO is disabled, by default. You can use partial SSO by sending users in your system through the Identity Authentication Service
Option 1: E-Mail Domain
3.1.1 Log on to your Identity Authentication console as an Identity Authentication Admin.
3.1.2 Select -> Applications & Resources -> Applications -> Choose your SAP SuccessFactors application -> Conditional Authentication

3.1.3 Click on “Add Rule”

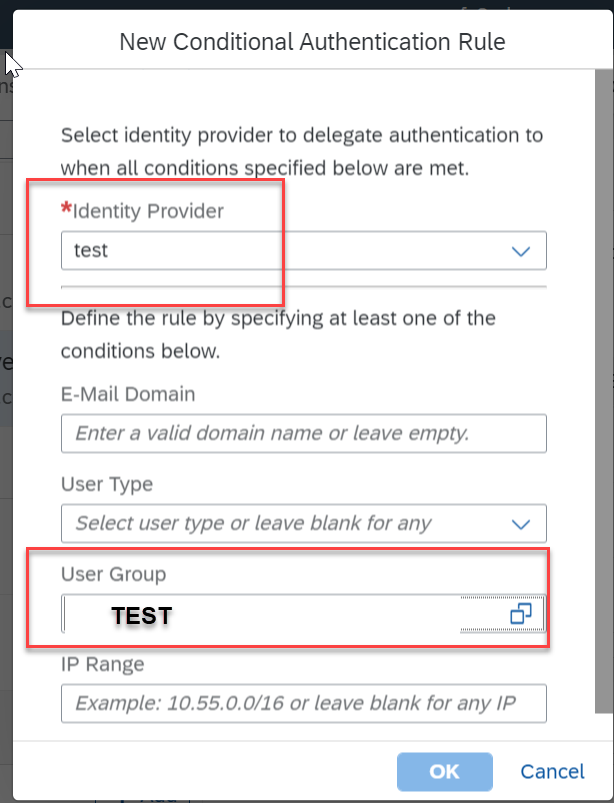
Select the Identity Provider and update the Email Domain

Note: If you want to add additional Rule you can follow the Steps 3.1 again. Example: .com and .in
3.1.4 Default Authenticating Identity Provider
To use Authentication rules you need to select “SAP Cloud Platform Identity Authentication”.

Option 2: User Group
If we want to ignore the e-mail dependency we can go with User Group option .
3.2.1 Log on to your Identity Authentication console as an Identity Authentication Admin.
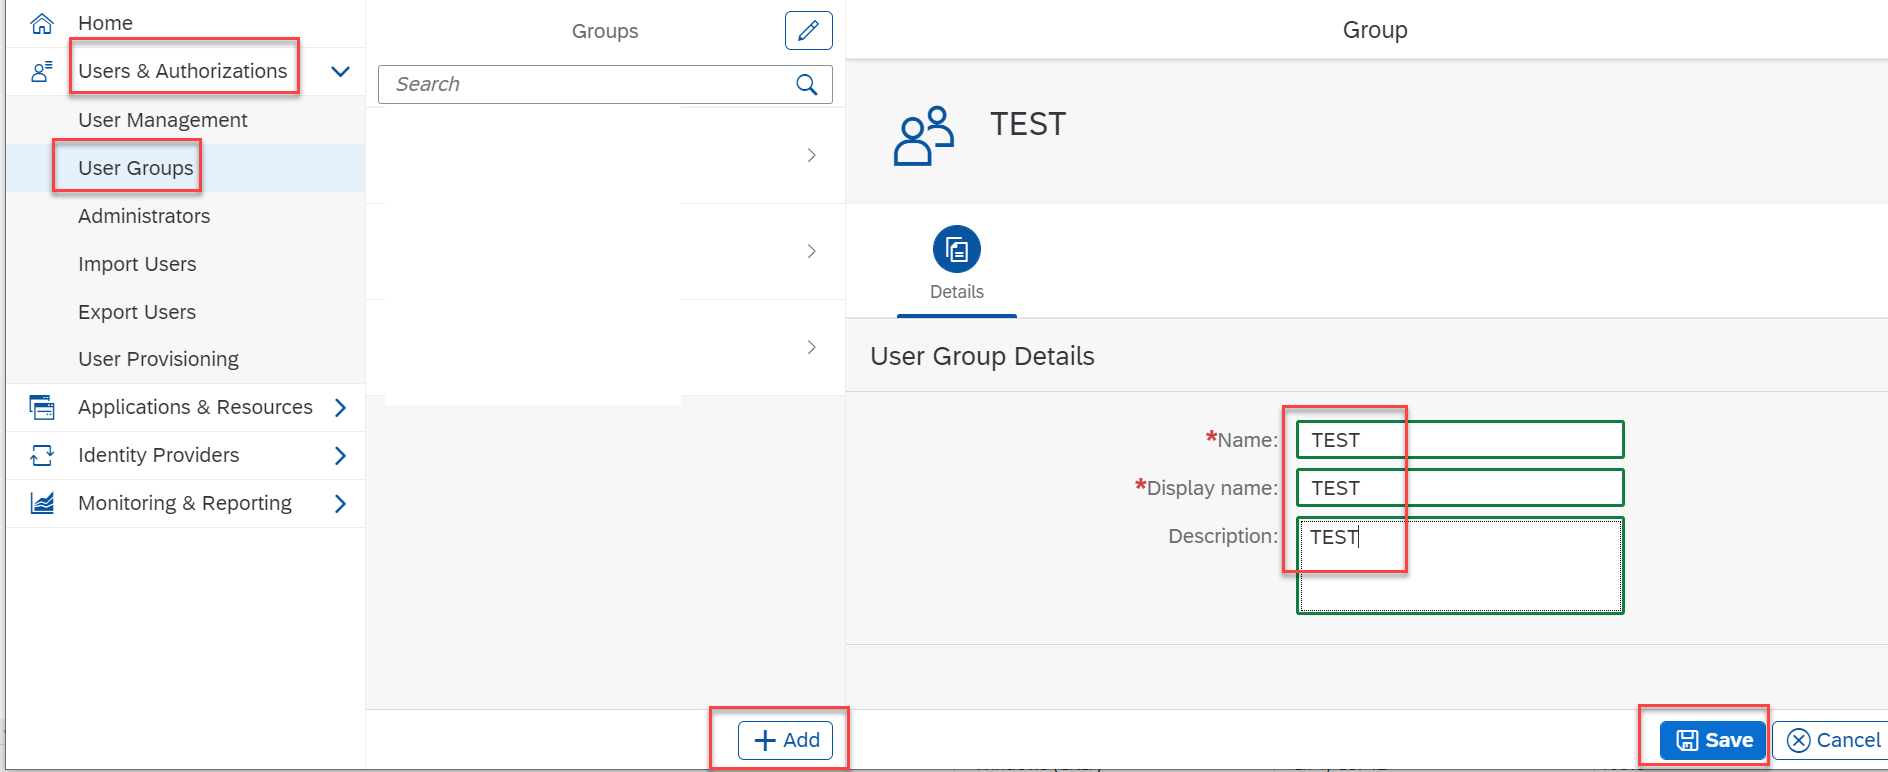
3.2.2 We need to create the user groups manually in IAS. Select Users & Authorizations -> User Groups -> Add
3.2.3 Log on to your Identity Provisioning Service (IPS) as an Identity Provisioning Admin.
3.2.4 We need to update Transformations in target systems in IPS with User groups details. Example: “TEST”
========================
{
“condition”: “$.userName =~ /.*.com*/”,
“constant”: “TEST”,
“targetPath”: “$.groups[0].value”
}
=======================
3.2.5 Select -> Applications & Resources -> Applications -> Choose your SAP SuccessFactors application -> Conditional Authentication
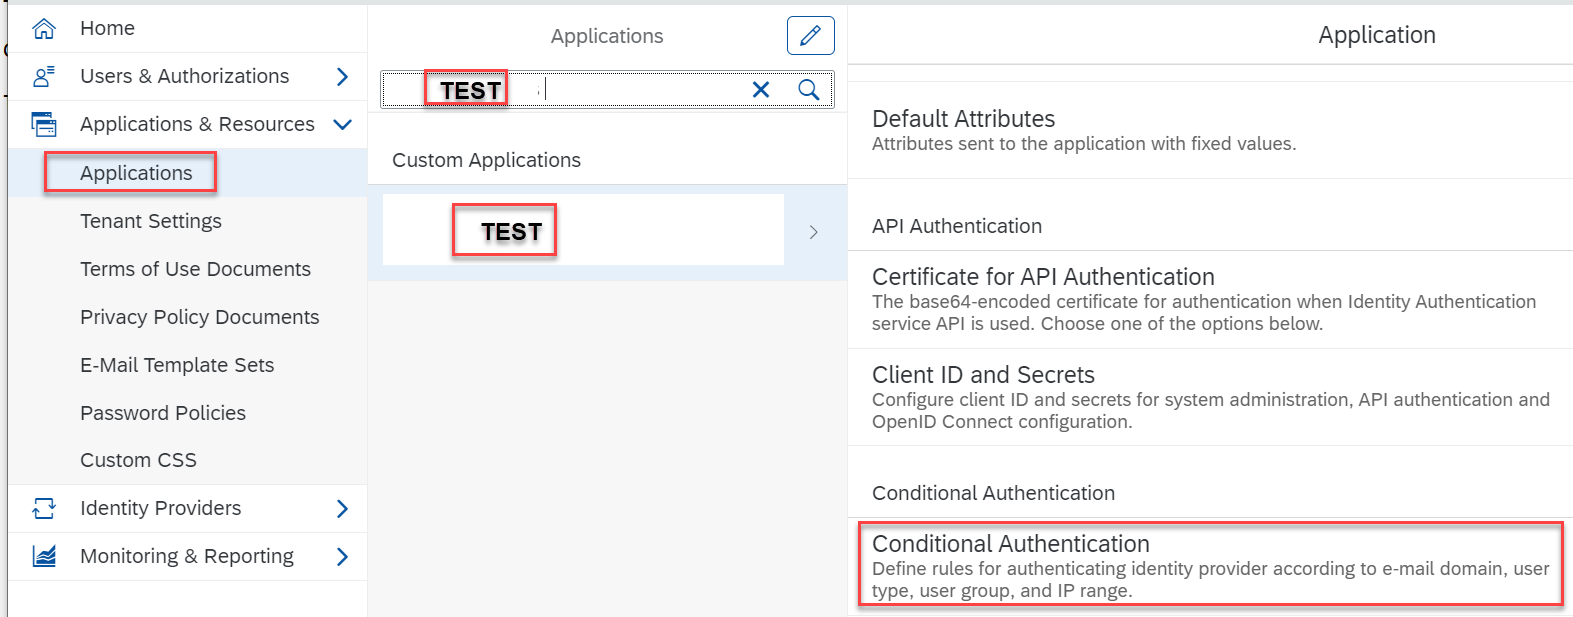
3.2.6 Click on “Add Rule”

Select the Identity Provider and update the User groups detail. Example: TEST
Step 4: Setting Up an SAP SuccessFactors API user(IPSADMIN) for Sync Jobs
In IPS, SuccessFactors is set as a source system, and Identity Authentication Service (IAS) is set as target system.
The API user created during the upgrade process is called IPSADMIN.
4.1 Log on to your SAP SuccessFactors system as SF Admin.
4.2 Go to the Admin Center.
4.3 Select Company Settings Password & Login Policy Settings .
4.4 Select API Login Exceptions.
4.5 Select Add
4.6 Enter the Username IPSADMIN, unless you’ve created another username.
4.7 Set Maximum Password Age in days to -1 (The password for this user should NOT expire. )
4.8 Refer the note 2791410 IP address restrictions
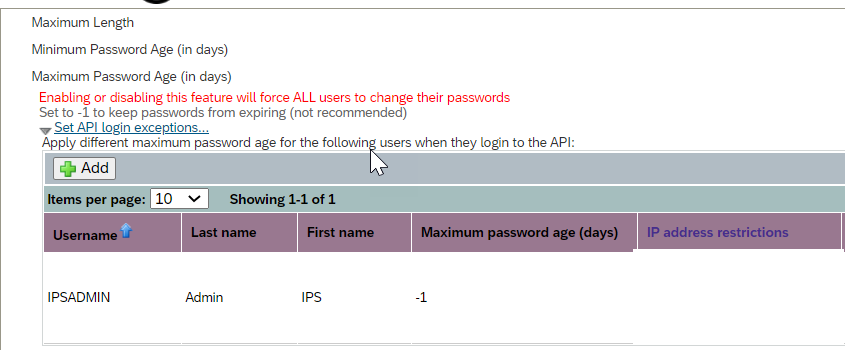
4.9 Save your changes
4.10 Grant permissions to your API user (IPSADMIN) that allows them to sync users.
4.10.1 Go to Admin Canter -> Manage Permission Roles -> Manage Integration Tools and choose “Allow Admin to Access OData API through Basic Authentication”.
4.10.2 Go to Admin Canter -> Manage Permission Roles -> Administrator Permission -> Manage User and choose “User Account OData entity”.
Step 5: Source System Configurations to migrate username and password (also known as password or non-sso users)
In this scenario you have an SAP SuccessFactors instance integrated with Identity Authentication. In the SAP SuccessFactors instance there are users that log on with username and password (also known as password or non-sso users).
5.1 Log on to your Identity Authentication console as an Identity Authentication Admin.
5.2 Under Identity Providers, choose the Source Systems tile.
5.3 Press the +Add button on the left-hand panel to add a new source system to the list.
5.4 Make the corresponding entries in the configuration for the target system you want to add
5.4.1 Source System Configurations : Update the company ID and type as SuccessFactors

5.4.2 First Logon Behavior : Choose if a user whose password does not meet the password policy requirements of the application must reset or change it after the first successful logon
5.4.3 Authentication Configurations : Update the Authentication URL(We can copy the API URL form source system URL details from IPS), Technical User(IPSADMIN)@COMPANYID and password

5.5 Save your configuration.
5.6 Choose Test Connection to test the source system configuration.

Step 6: User sync between SAP SuccessFactors and Identity Authentication
6.1 Login to your IPS instance
6.2 Click Source Systems tile
6.3 select the “SuccessFactors – CompanyID – source” and click on properties
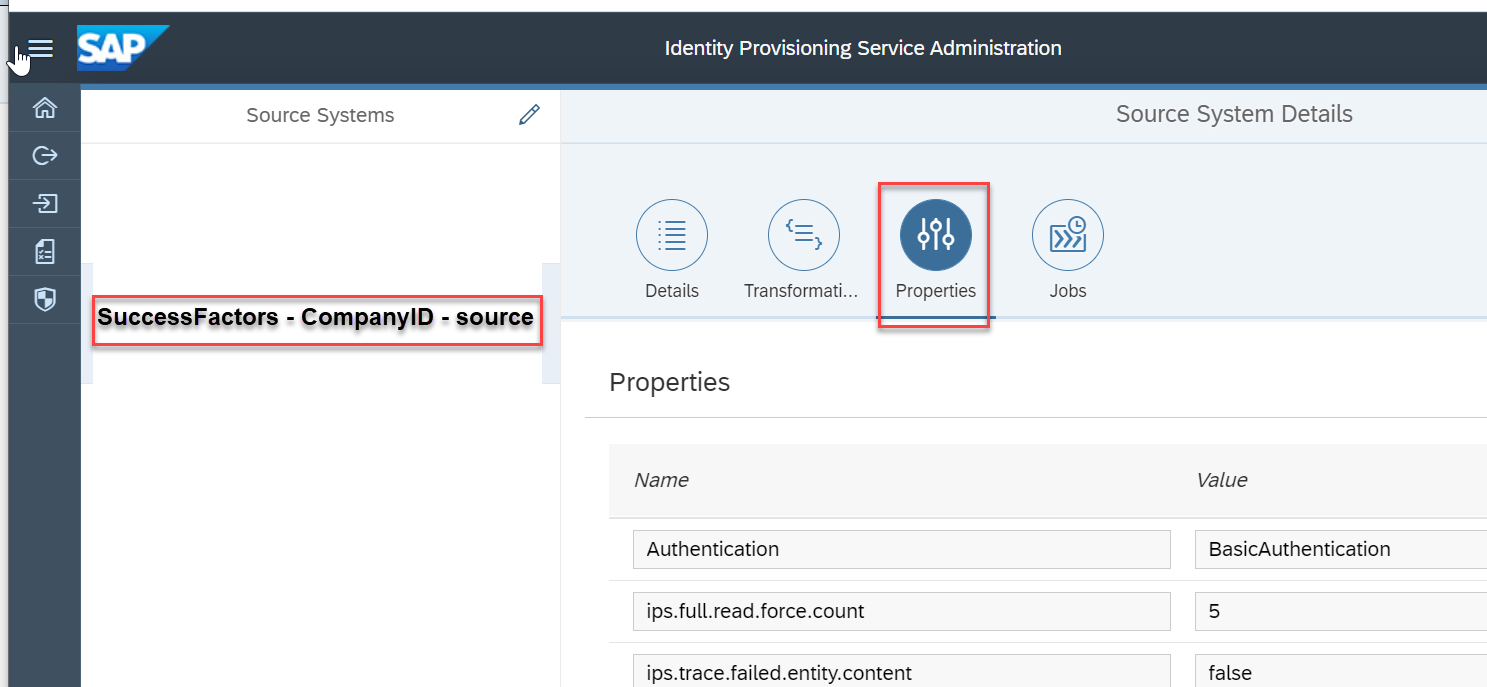
6.3.1 On IPS, update sf.user.filter field as this is a filter of the users that will be read by IPS on SuccessFactors
6.3.2 If you want to sync all status users filter we can use the value ” status in ‘active’,’inactive’,’active_external’,’inactive_external’,’active_external_suite’,’inactive_external_suite’ “
![]()
6.3.3 If you want to sync a single user we can use the value “status eq ‘active’ and username in ‘Test1’ ”
6.3.4 If you want to sync a couple of users, we can use the value “status eq ‘active’ and username in ‘Test1′,’Test2’….’Testn’ ”
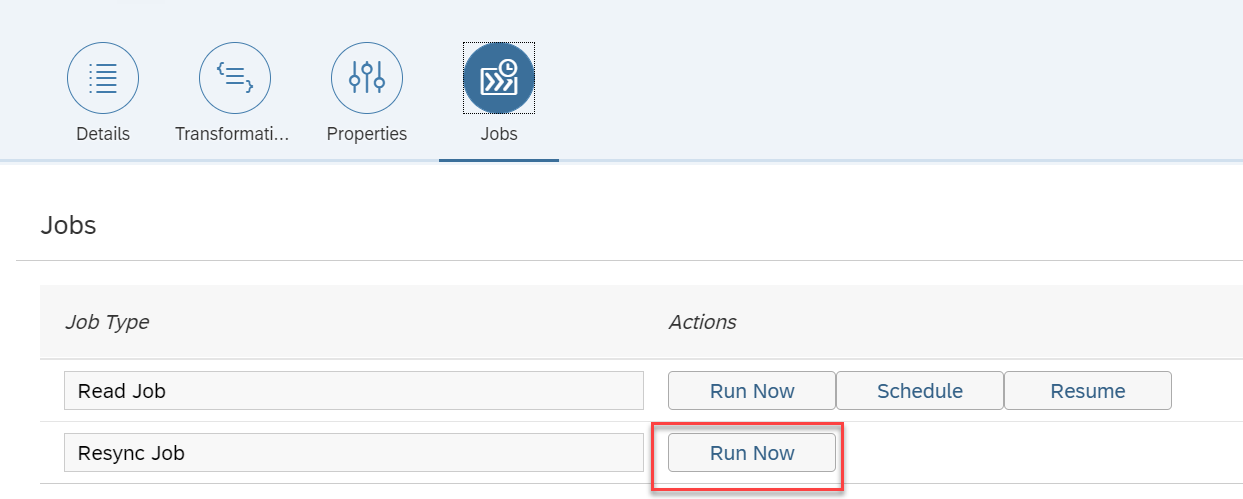
6.4 first time select the Resync Job and click on “Run Now ”
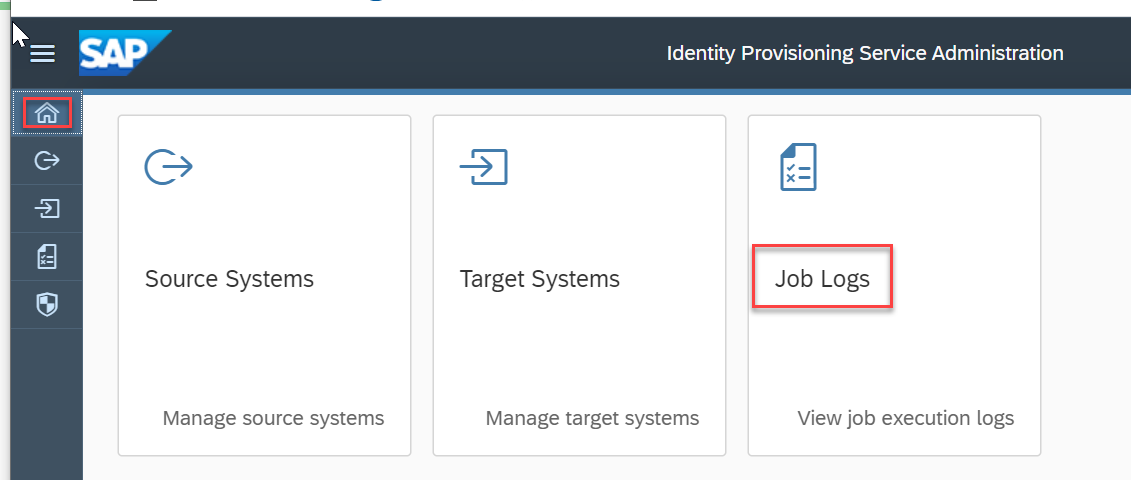
6.5 Check the job logs
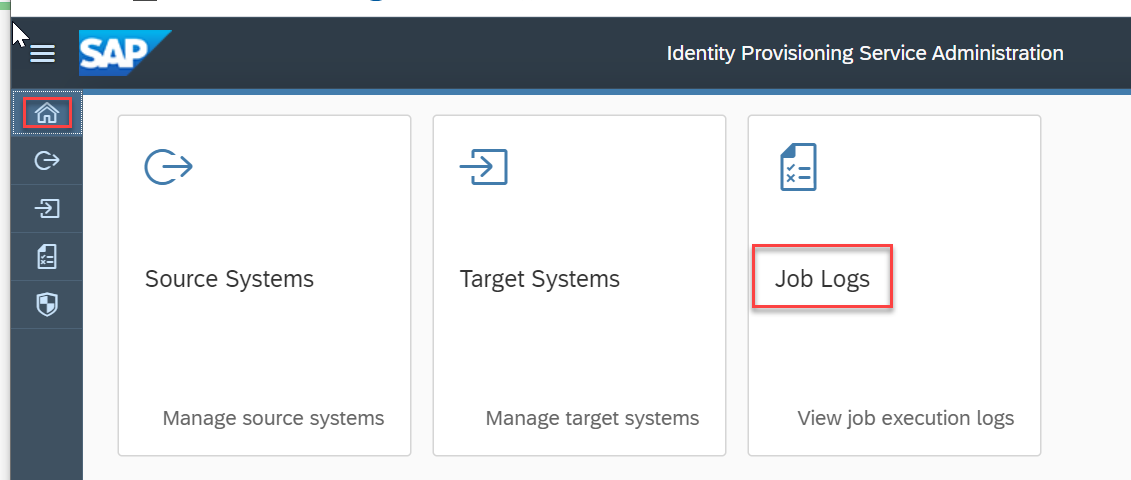
6.5.1 Once the job completed with status success we can check the changes in IAS User Management with additional users.

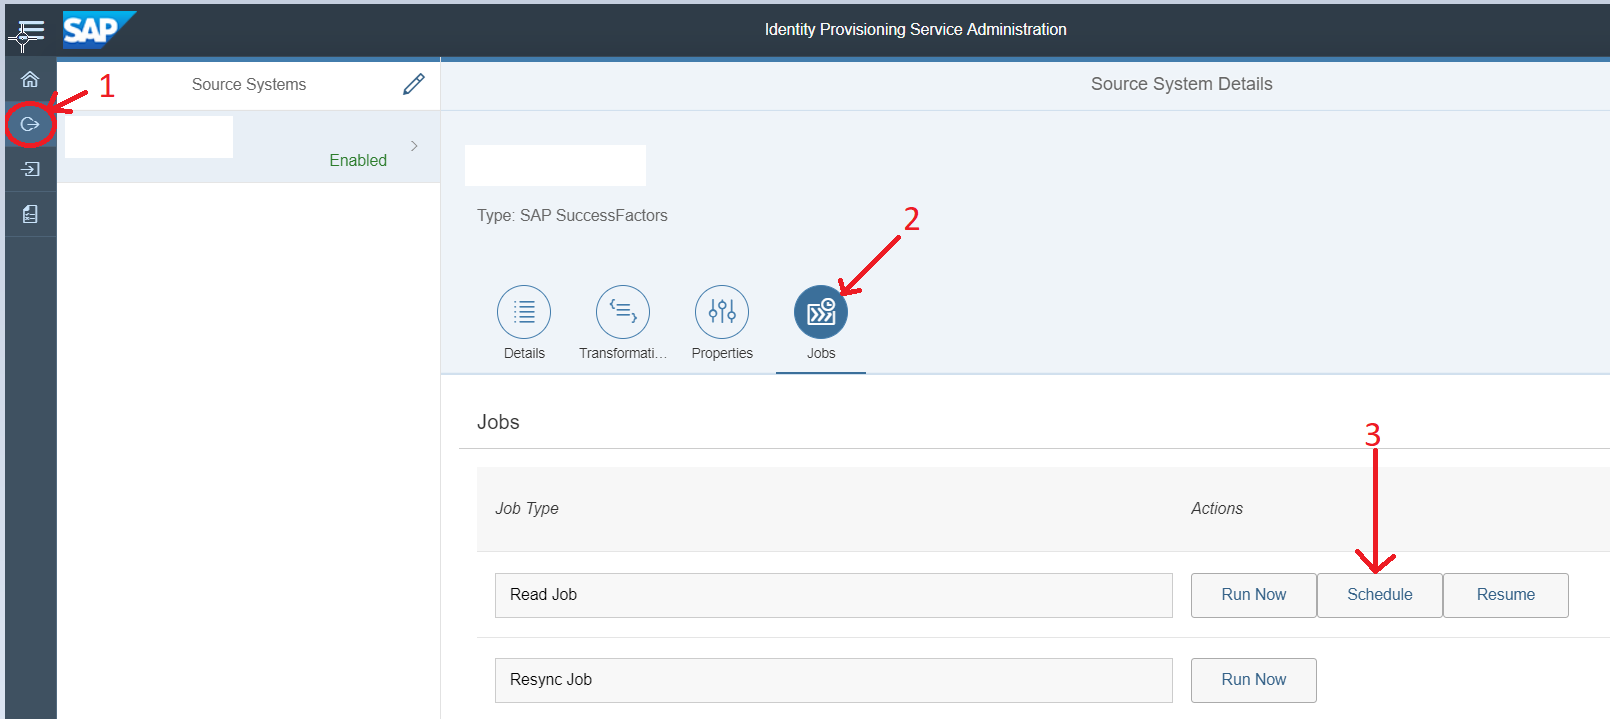
6.6 To schedule up the sync job to run, follow the steps below
6.6.1 Click Source Systems tile -> Jobs -> Schedule
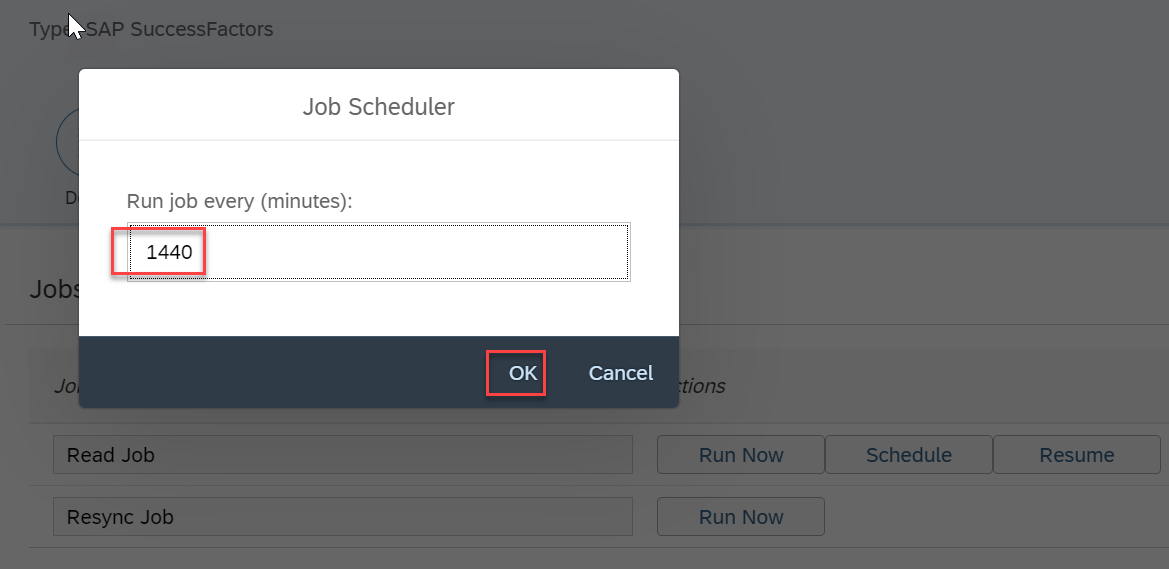
6.6.2 Enter the period that the sync will run (in minutes between executions)
After a scheduled job is set, choose the Resume button to actually start the job. This is a required one-time manual step.
Once Resume is selected, the job automatically starts according to the predefined period of time.
6.7 We can check the job status in job logs
Step 7: Enable SAP SuccessFactors to SAP Cloud Platform IAS Integration
7.1 Go to Admin Center
7.2 Access Upgrade Center
7.3 Find the upgrade Activate SuccessFactors SAP Cloud Platform Identity Authentication Service Integration;
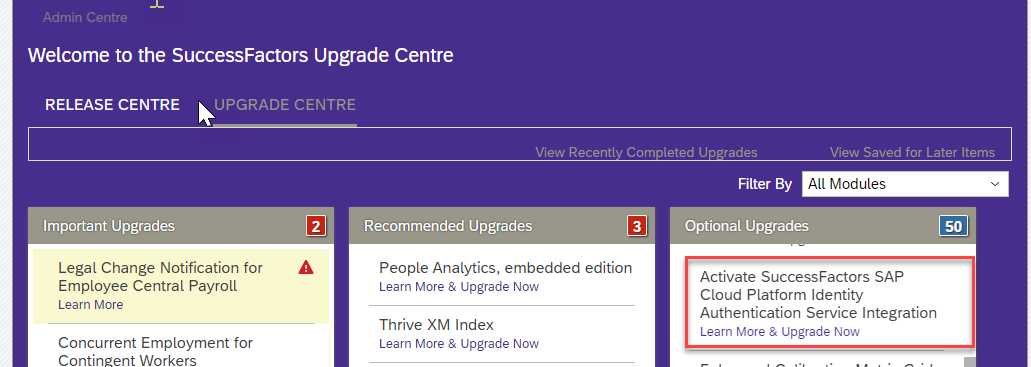
7.4 Click Learn More & Upgrade Now
7.5 Click Upgrade Now
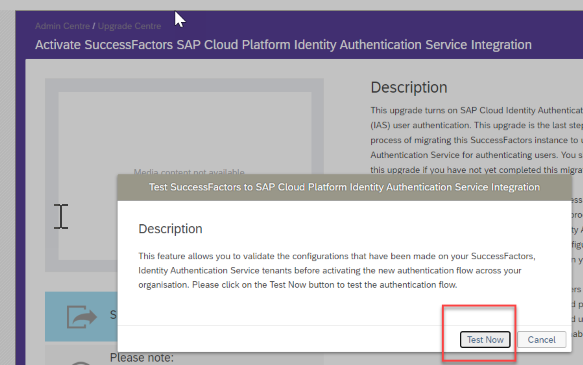
7.6 Click on “Test Now”
7.7 Enter the SuccessFactors username and password in IAS redirected URL.
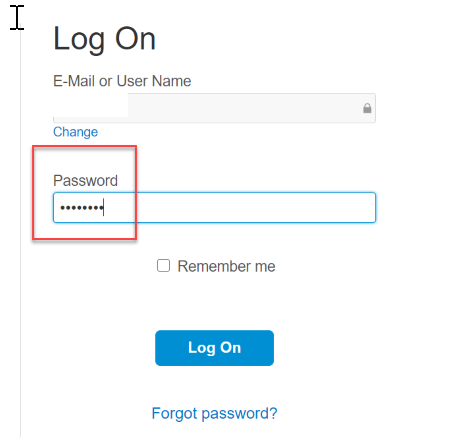
7.8 Once the Authentication Success please go back to upgrade center

7.9 Downtime is recommended before you click on Yes
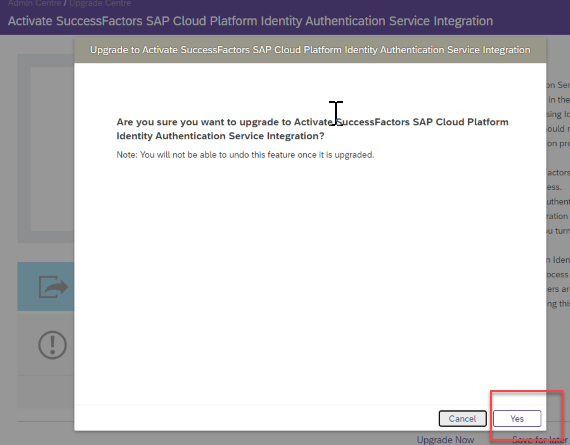
7.10 Click ok
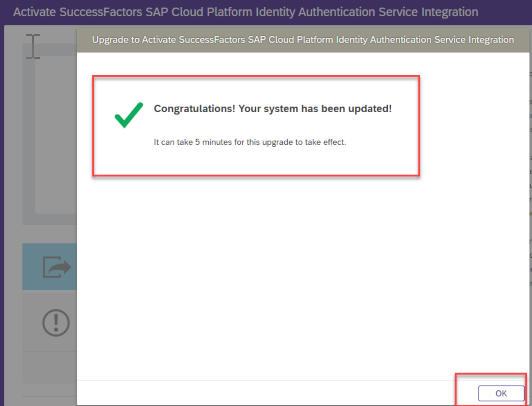
7.11 After this your instance will be integrated with IAS and your users will be redirected to login through IAS.
Reference SAP Notes:
2791410 – Integrating SuccessFactors with SAP Cloud Identity Authentication Through the Upgrade Center
2674264 – Configuring SSO between Corporate IDP, IAS Tenant and BizX Instance when using IAS as a proxy to Corporate IDP – BizX Platform
2813054 – How to setup SuccessFactors BizX-IAS integration to sync users from BizX to IAS
2392076 – User Permanent Purge feature
2950998 – How to migrate User Passwords from SAP SuccessFactors to SAP Identity Authentication Service (IAS)
2954556 – How to implement Partial SSO after IAS implementation on SuccessFactors
2320766 – [SSO] Partial Organization Single Single-On: Data model configuration, tips & tricks from Support for Partners
2277508 – SuccessFactors Cloud Manual Instance Refresh Process & FAQ
2954491 – IAS Integration Upgrade post refresh issue
2968411 – IPS job fails with error: HTTP operation failed invoking <url> with statusCode: 403, Response: [LGN0002]
2905030 – IPS provisioning from SF source to IAS target – Property lastModifiedDateTime is not available – for v4admin user
2987164 – Transformed source entity id cannot be null
2954815 – Configuring IAS and IPS when two SuccessFactors instances are mapped to one IAS tenant
Conclusion
Now SSO SuccessFactors configuration by integrating SAP Cloud Platform Identity Authentication (IAS), SAP Cloud Platform Identity Provisioning Service (IPS) and Azure AD account is completed. We should first implement it in a non-prod system and perform tests before deploying it in Production system.

Leave A Comment?
You must be logged in to post a comment.